Note: If an export is currently
processing in TrialMaster, the data sync fails and retries in 5 minutes.
Note: If an export is currently
processing in TrialMaster, the data sync fails and retries in 5 minutes.When installing a database, you have the following options:
· Data model database – To request/schedule exports and run data syncs (synchronizations) in TrialMaster. TrialMaster users can ensure their exports include the latest data by running a manual data sync from the Export History page (via Run > Export). The Export History page displays the date and time of the last sync so the user can decide whether a new data sync is needed.
Note: If an export is currently
processing in TrialMaster, the data sync fails and retries in 5 minutes.
· Reporting environment – To replicate the TrialMaster database and use it as reporting database and for the sync with the data model database. It is recommended to set the TrialMaster reporting connection to point to the reporting database since reports run more efficiently when they are processed on a separate server.
Note:
You
must uninstall the data model database connection before you can set up
the replication database. It is recommended to remove both the replicated
database and the reporting database connections during the uninstall.
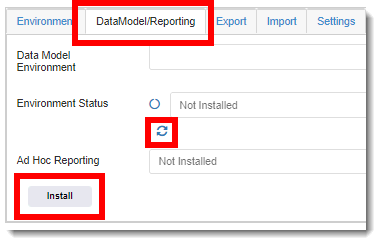
To install the data model/reporting database:
1. Access the Trial Configuration page. (See Configure a Trial for guidance.)
2. Click the DataModel/Reporting tab.
3. Click the Install button.
The Install Data Model dialog displays.
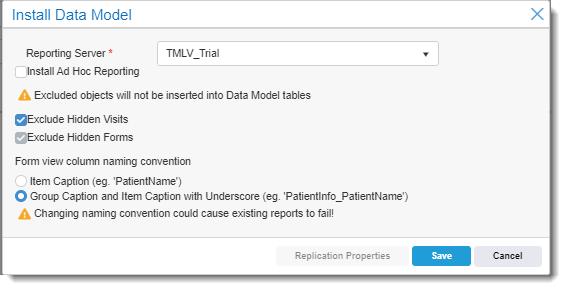
4. Select/de-select the following options to complete the dialog:
· To install the Ad Hoc Reporting tool, select the Install Ad Hoc Reporting check box. (Ad Hoc global settings must correctly populated under Setup > Settings. See Set Up Ad Hoc Reporting for details.)
· If you want to include hidden visits/forms in the data model tables, de-select the Exclude Hidden Visits/Forms check box(es).
· If you want to change the default form view column naming convention (Group Caption and Item Caption with Underscore), select the Item Caption option.
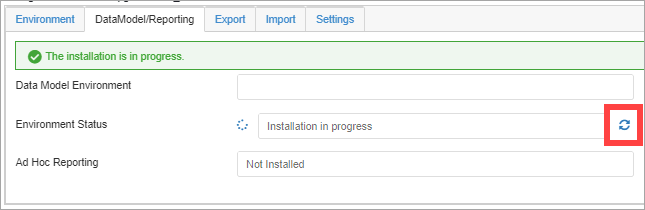
· Click the Save button. The top of the DataModel/Reporting tab displays a message indicating the installation is in progress. During this status, no buttons are available at the bottom of the tab. However, you may perform other tasks while waiting for the installation to finish.
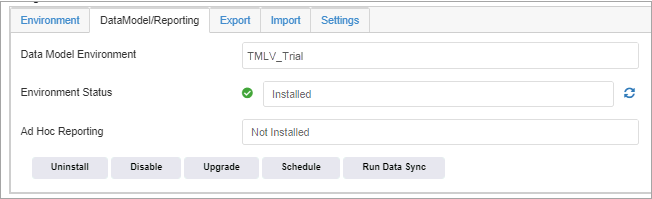
5. Click
the  Refresh
icon to view the new status. The Environment Status/Ad
Hoc Reporting field display one of the following icons/values. (This example
only shows that the data model database was installed.)
Refresh
icon to view the new status. The Environment Status/Ad
Hoc Reporting field display one of the following icons/values. (This example
only shows that the data model database was installed.)
·  Check Mark icon –
displays if the installation was successful, and populates the
field with "Installed"
Check Mark icon –
displays if the installation was successful, and populates the
field with "Installed"
·  Not Installed icon – displays if the installation is
still in progress, and populates the field with "Not Installed"
Not Installed icon – displays if the installation is
still in progress, and populates the field with "Not Installed"
·  Error
icon displays – if the installation
was not successful, and populates the field with "Error"
Error
icon displays – if the installation
was not successful, and populates the field with "Error"
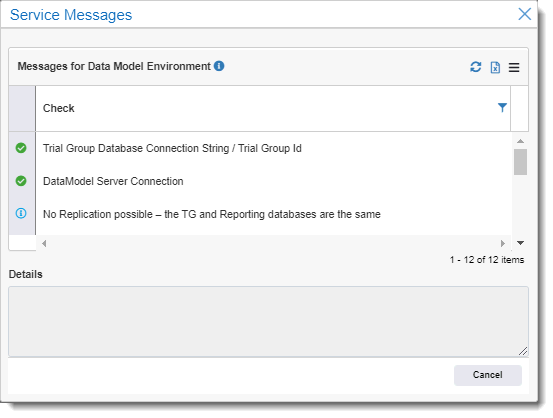
6. Click on an icon described above to view any messages or errors on the Service Messages page. Clicking on a row provides details about each message. Note that the trial group and reporting database cannot be the same, as shown in the example above.
7. If replicated environment is installed correctly, click the Rebuild Procs button at the bottom of the Trial Configuration page. This forces stored procedures, views, and functions to rebuild and re-create on the replicated database.
8. Click the Go Back button above the dialog to return to the Trial Configuration page.