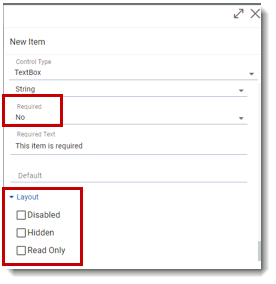
The edit check types explained in this section are those that are also available as item properties. These are: Required, Hidden, Read Only, Enabled, and combinations of these (Required/Enabled, Disabled/Hidden). When creating a new item, you can to set these properties. Anju recommends setting ONLY the Hidden property, and only in cases when there is no chance of wanting to unhide the item later (flag items, coding fields, etc.).
Using Edit Checks to Control Properties
In general, it is best to use edit checks to control these item properties. This method allows you to set the property to be always True or always False, or to be dependent on some other value(s). These values could be entered by the user (item value) or related to the state of the item itself (Form Instance Number, Group Instance Number, Visit).
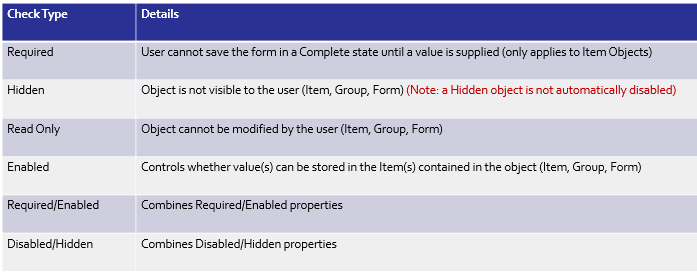
Edit Check Types for Properties
The following table describes how edit checks that affect the properties of an object.
Writing Edit Checks
All action expressions must return a Boolean value (True/False). The language for programming edit checks is JavaScript. (See JavaScript Examples, JavaScript Operators, and JavaScript Functions for more information.)
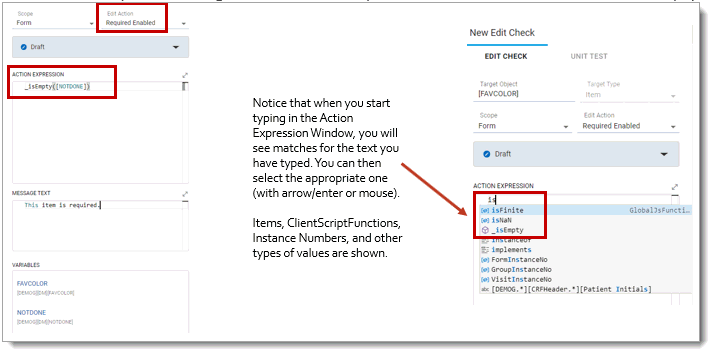
The _IsEmpty() function should be used to check whether a value is present.
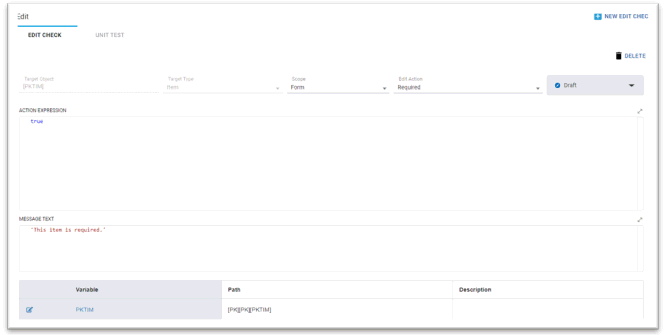
The action expression of a check can be set to always evaluation to True or False, if appropriate, or to return a result dynamically based on other values entered by the user. The following is an example of setting an item to always be Required.
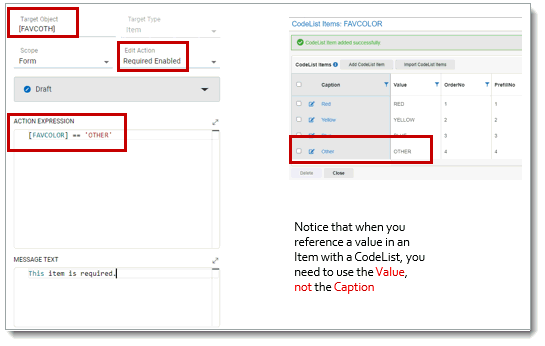
This is an example of setting an Item to be Required/Enabled based on another item’s value.
This is an example of setting an item to be Required/Enabled when a check box is empty.
Often, checks are paired with an “opposite” condition. For example, first check to make an item is Required/Enabled when a check box is empty, with a second check to make the same item Hidden when the check box is marked.
If you do not want an edit check to fire when the study is published (if it is still in development, or is to be disabled as part of a Mid-Study-Change), you can click the Excluded check box in the top right of the Edit Check window of that edit check.
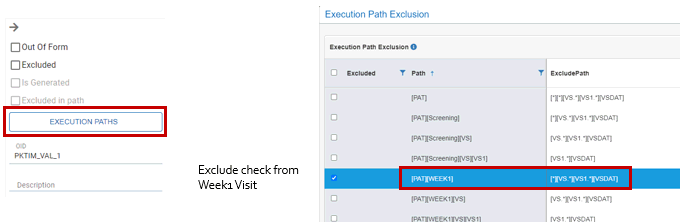
Clicking the Execution Paths button allows you to view the paths that apply to the edit check and select the paths for exclusion. The edit check will not run for the selected paths. This is useful, for instance, when writing an edit check at the form level, and then excluding it from visits where it does not apply (commonly, this exclusion step would exclude Unscheduled and Screening visits).
Once you have created the edit checks you want to test, you are ready to duplicate and publish your trial for testing.